| |
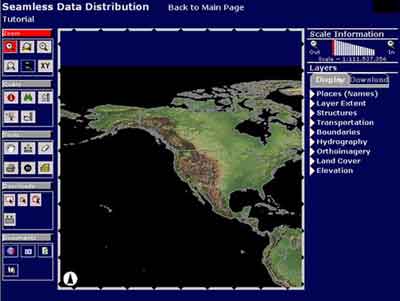
Let's import real life Yosemite Park terrain with a help of a couple of free tools and internet as source for data. Actually in this example we are using free terrain data from the following address http://seamless.usgs.gov. This site offers terrain elevation data and other information covering US wrapped up in a nice and usable interface...
http://seamless.usgs.gov/website/seamless/viewer.php
Probably the nicest thing about getting your terrains from this site is that as the name suggest, their terrain data isn't split up into chunks so you will be able to select exact area of U.S. and it will be split up for you. Plus you get to select download resolution and format type. Coming from Europe I want to give credits to people who maintain the site (and basically the owner U.S government) and hope that one day somebody will cover some other part of the world too without charging ridiculous amount of money for it... Enough of dreaming...
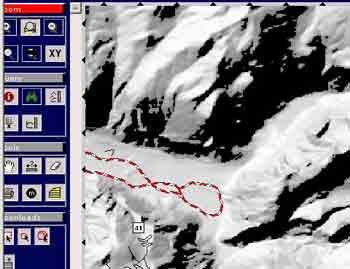
The above picture shows how we selected a certain area around Ground Canyon. Of course you can locate any spot in U.S - as long as you know longitude and latitude coordinates or if you use navigation panel on the site.
Once area is selected, we set up download resolution (in this case 10 meters) and download format. For download format we choose GeoTiff and once data is downloaded, we can use the following tool to convert data to the final format - 3DEM... Great free tool for terrain conversions and here's the home page: http://www.visualizationsoftware.com/3dem.html
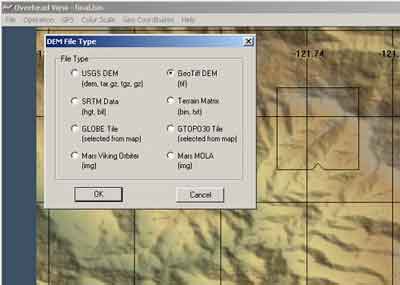
In 3DEM you can scale, crop and do many other things to your terrain data but in this case we really want to maintain real life proportions, so the only thing to do is to export terrain as terrain matrix. Two files are created. First one is a description file with an 'hdr' extension while the other one is a raw terrain data.
|
| |
We are back to 3ds Max. Go to File/Import and pick 'Binary / 3DEM Terrain Matrix File'. This starts up probably the most hidden feature of GroundWiz - terrain importer. After selecting Yosemite Park terrain file, the following dialog box shows up:
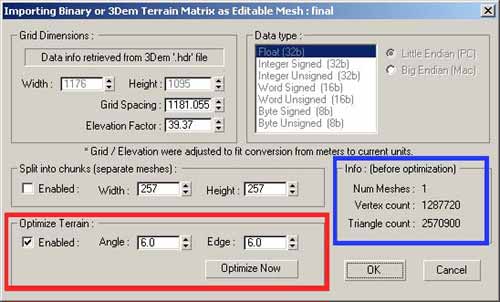
Options that are presented to you deal with importing raw data, so if you have some programming knowledge you could create your own custom data for import. The thing we are interested in - in our case - is specifying optimization options. We could just import the terrain without optimizing it, but we would end up with a huge number of polygons and dealing with big objects (for example, 5 million triangles, it is no fun. Trust me, no fun). In case you are importing a huge terrain, 'Split into chunks' may be very useful so that your computer doesn't run out of memory. After importing the terrain into 3ds Max in chunks, you can merge them back together.
Nice thing about GroundWiz importer is that it allows you to test optimization level - basically finding a compromise between final mesh size and optimization amount. The main parameter for this is 'Angle' under 'Optimize Terrain'. Set it up to 5 degrees and click 'Optimize Now'.
After optimization is done, check the Info section of the dialog box. 'Vertex Count' and Triangle count' are the 2 important pieces of information. Decide on how big terrain mesh you will allow - change the 'Angle' parameter and click 'Optimize Terrain' again. Bigger angle optimization will produce smaller mesh with fewer triangles but edges will be more noticeable of course. The amount for 'Angle' really depends on the terrain you are trying to import. In our case we used 5 degrees and ended up with 800,000 triangle mesh. (Note that example that comes with this tutorial is further optimized to reduce the final file size). Finally click OK on the Importing Dialog window and terrain importing will proceed.
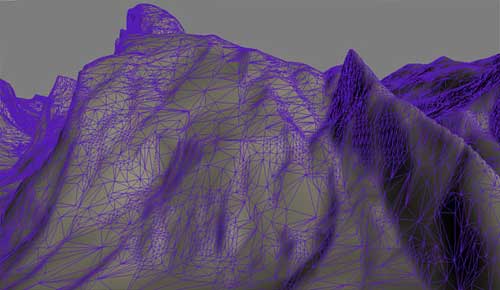
That's it
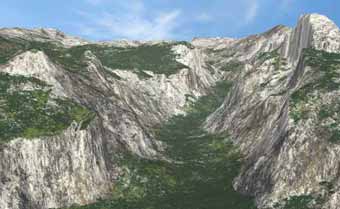
We finished with the terrain mesh ready to be textured by GroundWiz. Since this tutorial is focused on the importing part of it, we won't go into detail on the GroundWiz layer setup
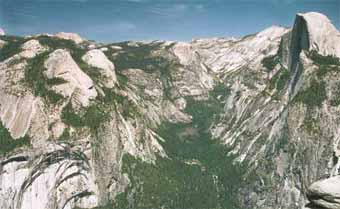
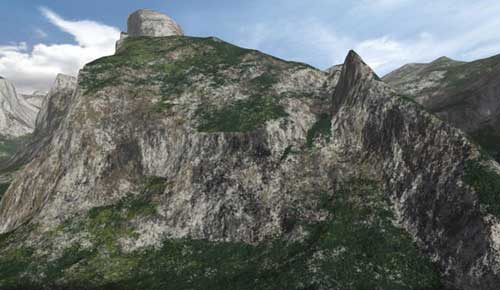
After some work on layers - here is the end result.
|
| |
Update (June 25, 2008):
The tutorial mentions how to select terrain resolution and download terrain data from seamless.usgs.gov. It seems that download settings were modified some time ago by the usgs web site provider.
When download region is selected, click on 'Modify Data Request' and select download resolution. Terrain resolution is now specified in Arc Second (Earth angular measurement).
As an example:
1/9 Arc second is approximately 3 meter resolution (probably highest resolution you can find on this site).
1/3 Arc second is approximately 10 meter resolution.
1 Arc second is approximately 30 meter resolution.
30 Arc seconds is approximately 1000 meter resolution.
You will probably notice that different areas of US are downloadable at different terrain resolutions - highest resolution won't be available for every section of US.
|